
It’s no secret that the disc golf world loves the videos from Jomez Productions and Central Coast Disc Golf. I love them as much as anybody else. From the graphics, the crispness of the video, to the commentary, what’s not to love about them. If you’ve been following my blog over the past couple of years, you may have read the interviews I’ve done with each of them. They both use cameras that cost well over two thousand dollars.
Some of the links in this post are affiliate links, meaning, at no additional cost to you, I will earn a commission if you choose to make a purchase. I am very grateful for your support of this site in this way. Thank you.
When I decided to get into disc golf filming, I did so at the low, low cost of $0. How? I borrowed a camera from a friend. I did end up buying a larger battery to use with it for about $20, which I gave to my friend to keep after I was done filming. That particular camera was the Canon Vixia HF G20, shown below.

Here’s a quick rundown of that camera:
- Capture Full HD 1920 x 1080p Video
- Canon 2.37 Megapixel HD CMOS Pro Sensor
- 32GB Memory & Dual SD/SDHC/SDXC Slots
- Genuine Canon 10x HD Video Lens
The full 1080p video is nice and crisp. The zoom on it wasn’t extremely far-reaching, but more than enough to keep a disc in frame. When I put it on a monopod, it became a great camera to use for disc golf. One caveat. It wasn’t mine. Sure, I used it to film 3-4 tournaments, and big thanks to my friend for letting me borrow it.
What Do You Already Own?
Before I went diving off the deep end into the realm of video cameras, I did some research. I came across a Youtube channel called Think Media TV. It’s run by a guy named Sean Cannell, a now full-time Youtuber. He had been in media production for several years before striking out on his own. There are several gear reviews and gear suggestion videos that got me thinking about what I would eventually buy.
One of his main points across many videos is that you can use what you already have to start making videos. A great number of us have smartphones, be it Apple or Android, that can record 1080p video. I had tried using mine a few times to film myself throwing, without much success at first. My Samsung Galaxy S5 can even do 1080p60 and 4K video! It’s amazing what our smartphones can do these days.
Taking into account that you probably have the big 3 social media platforms on your phone in Facebook, Instagram, and Twitter, then you have a powerful tool in your hand, pocket, or purse. Or, in our cases, our disc golf bags.
What Now?
OK, with the phone in hand, how do you plan to go about filming your disc golf adventures? It brings to mind a couple of questions about how you’re going to film yourself. Where are you going to place the phone to record the shots and will you be alone, or with friends?
The answer to the first question is pretty easy. You’ll want to place your phone somewhere to catch yourself throwing, and possibly the flight of the disc as well. If you have a backpack bag or cart, then it’s pretty easy to prop the phone on either to catch your throws. Of course, if you have friends, they can always hold the phone and film it for you.
What I found, since I usually play a few holes at lunch, is that not every tee area has a good place where your bag/cart can support the phone with a good angle for filming. That’s where a flexible tripod comes in handy. I bought this one from Amazon to use with my phone. It includes a smartphone adapter that holds a wide range of phones. It doesn’t work great with thick protective cases though, which makes the phone holder piece a slight downer.

On the upside, it included a GoPro mount if you own one of those. With the built-in level, it’s easy to compose a good shot in less than ideal conditions. Wrap it around a small tree and bend it to have a level view of your throw. Set it on the bench next to the tee pad. Set it on the ground for an upward angle or to catch a good look at your footwork. It will suit your needs pretty well. It also helps that it’s only $15.
Want To Step It Up?
I was recording myself almost daily with my phone and the above tripod rig. I wasn’t quite happy with the videos I was making though. The courses that are near my work are also right next to a couple of high volume traffic roads. I was getting a lot of car noises that weren’t very complimentary to the sounds of disc golf. That got me looking into microphones that could be used with smartphones.
After days and days of looking all across the Internets, I set my sights on the Rode VideoMicro. Rode has another mic called the VideoMicMe, but it wouldn’t work with my Samsung Galaxy S5. It is meant to plug directly into the headphone jack on your smartphone, however, if your headphone jack isn’t on the opposite end of the phone from the camera, then you’ll be able to see the mic in your video. Thus, why I went with the Rode VideoMicro. The cable coming from the back of the mic allows it to be used with smartphones that have the headphone jack on the same side as the main camera.

Once I had the mic, I found out that it wouldn’t work with my phone. That was due to the cable it came with and the type of connector that headphone jacks on smartphones use. Those headphone jacks use a TRRS jack. Simply put, this means the jack is made to use with headphones that have an inline mic, so you still get the L-R audio, and the inline mic takes over for the normal mic. So, a bit bummed, I had to purchase the Rode SC7 3.5mm TRS to TRRS Patch Cable in order to use it with my phone. Rode makes a different adapter cable, but I chose this one since I might end up using it with a DSLR/Mirrorless camera at some point in time. So, the mic itself runs ~$60 and the patch cable runs ~$15, for a total of ~$75.

After setting my sights on this mic, and purchasing it, I was faced with another dilemma. I had no place in which to use it on the smartphone holder that attached to my flexible tripod. I made do for a time with using the cold shoe bracket that I had purchased in anticipation of buying my filming gear. It was pretty unwieldy and looked quite weird to see the bracket on the tripod with the phone attached to it and the mic on the bracket. I was in need of a better method of using what I had.

Enter the Ulanzi IRON MAN 2 Pro Smartphone Holder. I found this after more skilled usage of Google-fu and Amazonarate. Its integrated cold shoe mount was exactly what I was looking for to use for a mobile filming setup. The item that shows up in the link doesn’t include the short grip that came with it when I bought it. It ran me ~$20 when I bought it, but the link above has just the mount for $15 now. One of the best features of this smartphone tripod adapter is that it has a screw that allows you to tighten it down so the phone won’t fall out. My phone had a tendency to fall out of the one that came with the flexible tripod since it was tension based.
Ta-da!!
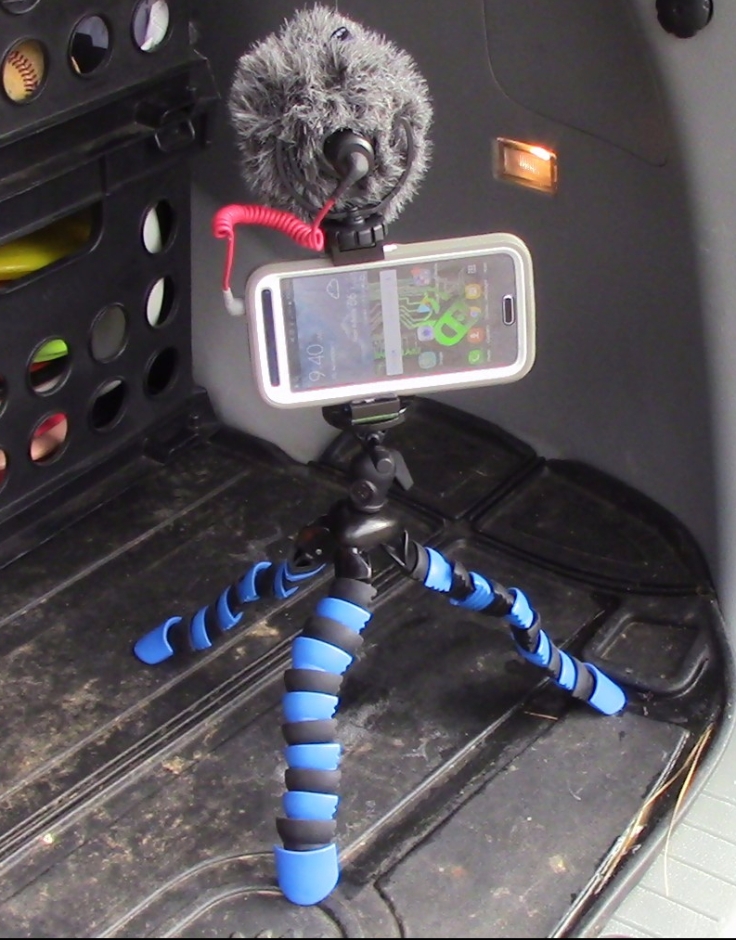
With everything put together, I can effectively record myself when I’m playing a lone round of disc golf. Not only can I throw multiple shots and choose which ones to share, I can see how bad the throws I attempted really were.
Recap:
Flexible Tripod : ~$15
Metal Smartphone tripod mount : ~$15
Rode VideoMicro : $60
Rode SC7 cable: $15
Total = $30 or so for just the tripod and smartphone mount, $105 including the mic and cable. If you were comfortable with the phone holder that comes with the tripod, you’d only spend $15.
Of course, there are many flexible tripods to choose from on the Internets. One of the most popular for vloggers is the Joby Gorillapod. The model I linked is $120, though Joby has models as cheap as $20 and they are made to support heavier weight as the prices rise.
So, you don’t need $4,000 cameras to begin making disc golf videos. Sure, they won’t be Jomez quality, but for sharing to social media, your phone and a few accessories are all you need. Check back for the next part in the series where I take a closer look at the gear I bought for filming tournaments.

December 5, 2017 at 8:02 pm
When I am filming anything to do with Disc Golf I use the Nikon D3200 camera. Works perfect for me!
LikeLike